The time series control panel is the first step in a wizard that you can use to create or edit a time series.
To create a time series:
-
Open a cBase
-
Do one of the following:
-
On the menu bar, select Data > Time Series Control Panel.
-
On the toolbar, click the Time Series icon
 .
.
The
 Time Series Control Panel opens.
 -
-
To add a time series, either click Add or double-click where indicated in the Existing Time Series box.
The Time Series General
dialog box opens. -
If you want the
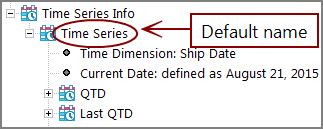
ProDiver Console to display something other than the default Time Series label, in the Name box, enter a name for the time series label. This name appears on the ProDiver Console Info section under Time Series Info.
-
If you intend to create a QuickView for the time dimensions and want the time series name to appear on the QuickView bar, select the Include Time Series Label in QuickView Bar check box.
NOTE: This
label is separate from the QuickView label. -
In the Time Dimension section:
- Select the Time Dimension that you want to use for the time series.
-
If you want to create a QuickView that lists all valid time dimensions in the cBase
You can use the QuickView to change the time dimension that the time series uses.
-
If you want ProDiver to prompt you for a time dimension to use for the time series when the DivePlan or marker opens, select the Prompt on initial selection check box.
-
In the Current Date section:
-
If you want the
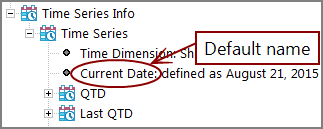
ProDiver Console to display something other than the default Current Date label, enter the Name that you want to display. - In the Current Date Definition box, select an option that defines Current Date.
-
- Latest date in model: Uses the most recent date in the time dimension as the current date. If you select this option, an Offset text box appears, which you can use to set a +/- offset number.
- System Date: Uses the date from the DiveLine server computer as the current date.
- Date Built: Uses the date from the most recent cBase
- Custom: Uses a date that you select from a Custom pull-down list as the current date. The dates listed in the Custom list are the values in the time dimension.
- Extract date: Uses the date that the cBase
-
Date set by QuickView: Creates a Current Date QuickView which you can use to select from a list of values in the time dimension. You can select a Default Value from a list similar to the Current Date Definition list, and also choose to be prompted for an initial selection.
-
Click Next.
The Time Series Type
dialog box opens. You can select a predefined time period template, or you can define the time period that you want to use.Rolling Periods: This option creates the Number of Periods (default: 2) that you specify. The Current Rolling period is the last period determined by the Current Date specified on the General tab. Depending on the Rolling Direction that you specify, it also creates time periods that precede or follow the current rolling period.
IMPORTANT: If you are defining a custom time period column, be sure that the column values are formatted as time periods. Other value types, such as strings, will not properly generate time series QuickViews.
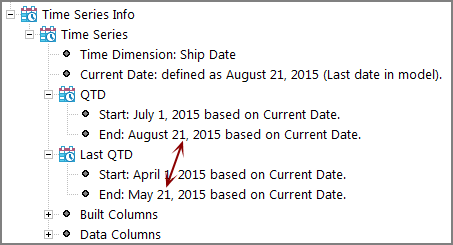
NOTE: When you use a to-date time comparison type and the current date is not at the end of the time period, the earlier time period used for comparison is adjusted to a similar amount of time. For example, if you are using the
QTD vs Last QTD template, and are in the 7th week of the 2nd quarter, the time series compares this QTD with the first 7 weeks of the Last QTD. -
If you want to use a pre-defined template, select a template from the Select Template list, and then click Add to the right of the Select Template box. Available options can vary, depending on the type of time dimension.
-
Blank: Select this option if you want to manually enter a time period
-
YTD vs Last YTD: Year-to-date data compared with last-year-to-date data.
-
HYTD vs Last HYTD: Half-year-to-date data compared with last-half-year-to-date data. For example, January–June 2018 vs July–December 2017.
-
HYTD vs Same HYTD Last Year: Half-year-to-date data compared with the same half-year-to-date last year data. For example, January–June 2018 vs January–June 2017.
-
QTD vs Last QTD: Quarter-to-date data compared with last-quarter-to-date data. For example, Q2 2018 vs Q1 2018.
-
QTD vs Same QTD Last Year: Quarter-to-date data compared with the same quarter-to-date last year data. For example, January–March 2018 vs January–March 2017.
-
MTD vs Last MTD: Month-to-date data compared with the last month-to-date data. For example, June 2018 vs May 2018.
-
MTD vs Same MTD Last Year: Month-to-date data compared with the same month-to-date last year data. For example, January 2018 vs January 2017.
-
Today vs Yesterday: This option builds two time periods, called Current Period and Previous Period, each one a single day long. The dates are the time period end date, and the previous day.
-
Rolling 12: This option creates the Number of Periods (default: 2) that you specify, each one 12 months long. It creates a Current Rolling 12 period consisting of the 12 months leading up to the current date. Depending on the Rolling Direction that you specify, it also creates time periods that precede or follow the current rolling period.
For example, assuming that the Number of Periods is 2 and the current date is December 31, 2018, this option builds a Current Rolling Period of January 1, 2018 to December 31, 2018.
- If you select a Backward Rolling Direction, this option builds a Previous Rolling Period of January 1, 2017 to December 31, 2017.
- If you select a Forward Rolling Direction, this option builds a Next Rolling Period of January 1, 2019 to December 31, 2019.
-
Current Period vs YTD: This option builds two time periods, called Current Period and YTD. Current Period is the last period determined by the Current Date specified on the General tab, and YTD is January 1–Current Date. For
example, if the dimension is Ship Month, the Current Period is the month defined as the Current Date, and YTD is January–Current Date. -
Current Period vs Previous Period: This option builds two time periods, called Current Period and Previous Period. Current Period is the last period determined by the Current Date specified on the General tab, and Previous Period is the next-to-last period.
For example, assuming that the time dimension is Ship Month, the Number of Periods is 2 and the current date is December 31, 2015, this option builds a Current Rolling Period of December 1, 2015 to December 31, 2015.
- If you select a Backward Rolling Direction, this option builds a Previous Rolling Period of November 1, 2015 to November 30, 2015.
- If you select a Forward Rolling Direction, this option builds a Next Rolling Period of January 1, 2016 to January 31, 2016.
-
If you want to define a time period, select Blank from the Select Template list, and click Add in the Periods section.
The Time Series Edit Period dialog box opens. For more information, see Manually Adding a Time Period.
-
Click Next.
The Columns
dialog box opens. -
Select Summaries.
A list of available summaries appears in the left box.
-
Select the summary columns to which you want to apply the time series, and click >> to move them to the selected box on the right side.
-
If you want to add DimCount columns, select DimCount.
A list of available dimensions appears in the left box.
-
Select the dimensions that you want to include a DimCount column in the time series, and click >> to move them to the selected box on the right side.
-
Optional. Reorder the selected dimensions in the selected box.
-
Click Finish.
Time series columns appear in the
dive window and time series data appears in the Console.


Template information appears in the Periods area or the Time Series Column Types area.
Proceed to step 12.

