Adding a Custom Analysis
This procedure applies to Workbench 7.1(20) and later. In earlier versions, you can add a custom analysis by editing the factory configuration file using a text editor.
To add a custom analysis:
-
On the Measure Factory Editor page, double-click the measure to which you want to add a custom analysis.
On the right, the detail pane opens to display information about the measure.
-
If necessary, expand the Display section on the detail pane.
-
Next to Custom Analyses, click the Add icon
 .
. The screen updates to show details for the new analysis. On the detail pane, it appears as Custom<n> of <Parent Measure Name>.
-
Right-click Custom<n> and provide a name for the custom analysis.
-
On the detail pane:
-
There must be at least one Initial dimension. If none are selected, Workbench displays an error icon
 at the bottom of the pane. If the measure has a default analysis defined, you might see a message that indicates that the initial dimension is inherited from the default analysis.
 The initial dimension determines the value that appears first in the dimension menu on the DivePort portlet. If available, you have the option to select Enable Assisted Analysis, which flags this dimension as eligible for assisted analytics.
-
Optionally, specify available dimensions in the
 box.
box.TIP: Click the Dimension icon
 to choose a dimension to add, or click the Dimension set icon
  to choose a dimension set to add.
 In DivePort, the specified dimensions can be selected for analysis.
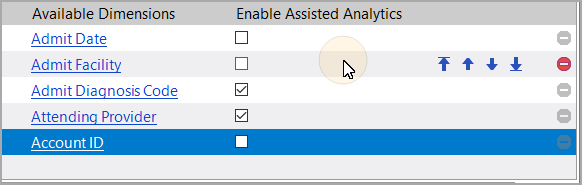
Click an item in the list to enable the option to select Enable Assisted Analysis (if available), which flags this dimension as eligible for assisted analytics. You can also change the order of the list or remove a dimension from the list.
-
Optionally, specify QuickView dimensions in the
 box.
box. These QuickViews appear on the analysis portlet in DivePort.
TIP: Click the Dimension icon
to choose a QuickView dimension to add. When a QuickView dimension is added to the list, you can select the following options:-
Allow 'All Values'—selected by default
-
Single Select—cleared by default
-
Change the order of the list
-
Remove a dimension from the list
-
-
Enter analysis summaries in the
 box.
box.These summaries appear as columns on the analysis portlet.
-
-
Save the file.