Creating a Survey
Create surveys to inform people about different venues, customers, displays, sales, and more.
To create a survey from the Surveys page:
-
Select New Survey.

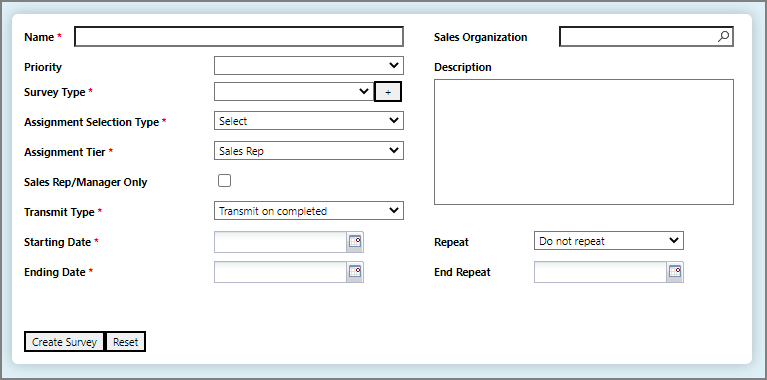
The New Survey page opens.

-
Fill in the required survey fields:
-
Name–Enter a concise name.
This name appears on the Survey page listing.
-
Survey Type–Select the Survey Type that you are creating. Or select the plus button to right of the text box to add a new type.
-
Assignment Selection Type–Select the means of assigning the survey:
TIP: Consult your DI Administrator to review the customer and product data defined in the cBases for the purpose of configuring surveys.
-
All–The survey is assigned to all sales representatives or sales representative/customer combinations depending on if Sales Rep/Manager Only is selected.
-
Select–Assignments are determined by including or excluding certain values, such as products, sales representatives, and customers.
-
Upload–Uploads a text file containing a list of assignments. The file must contain two columns without headers. The first column is a list of sales representatives and the second column is a list of customers. If Sales Rep Only is selected, the second column should be blank.
-
User name–Surveys are assigned to DiveLine users or groups of users instead of sales representatives.
-
-
Assignment Tier–Determines who the survey is assigned to.
-
Manager– Only managers are assigned to the survey.
-
N/A–Used when the Assignment Selection Type is "User name" because the survey is not tied to sales representatives/managers but to DiveLine usernames.
-
Sales Rep–Only sales representatives are assigned to the survey.
-
-
Transmit Type–Select the transmit type:
-
Transmit on completed–Links back to the server as soon as the survey is completed and the sales representative presses the Sync button on their iPad.
-
Transmit on due date–Delays transmission of the survey until after the due date when the sales rep selects Sync.
-
-
Starting Date–Use the date picker to select a start date.
-
Ending Date–Use the date picker to specify an end date.
-
-
Optionally, enter:
-
Priority–Select High, Medium, or Low as a priority type.
-
Sales Rep/Manager Only–Select to remove the customer component of assignments, specifically for non-customer focused surveys. When a user selects the survey in Survey Advisor, they are directed to the survey instead of a list of customers first. This allows the sales representative or manager to take any survey regardless if they have customers assigned to them.
-
Sales Organization–Select from the list of sales organizations or search a specific sales organization.
-
Description–Enter text that describes the purpose of the survey and the data to be collected.
-
Repeat–Specify how often you want the survey to repeat:
-
After Submission–The survey is immediately available to take again after completing the survey and syncing.
-
Do not repeat–The survey is available one-time only.
-
Every 3 months–The survey is available again after 3 months.
-
Every 6 months–The survey is available again after 6 months.
-
Every month–The survey is available to repeat each month.
-
Every week–The survey repeats each week.
-
-
End Repeat–Select a date from the date picker if it is a repeating survey.
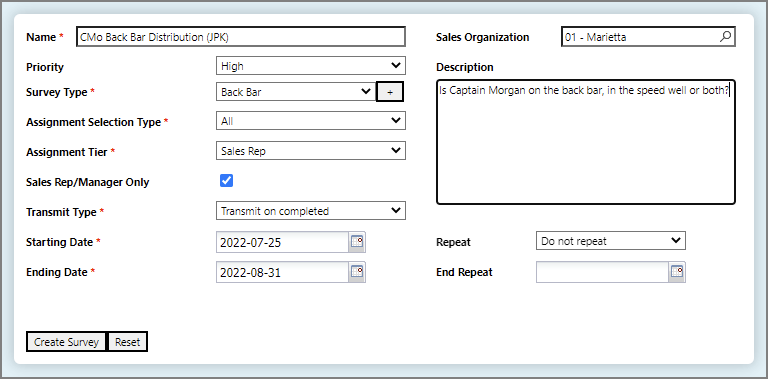
An example of a filled in survey.

NOTE: Select Reset to start over.
-
-
On the bottom left, select Create Survey.
Your survey is created.
