Adding Group Dimension Name and Value Items
You can create a simple tabular and follow the steps in this topic to create a named group and add its associated items to a report. Otherwise, open the marker you saved from Adding Parent Dimension Name and Value Items as a starting point.
Complete the following steps to create a Named Group called Q1_2007 and then add a Group Dimension Name and Group Dimension Value to a report.
-
Select a server with a project that contains a sales model with Customer and Product Family dimensions.
-
For example, locate and open demo.drl.mdl using ProDiver.
-
On the Console, double-click Customer.
-
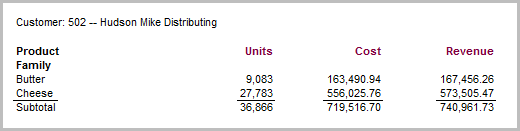
On the dive window, select 502 -- Hudson Mike Distributing.
-
On the Console, double-click Product Family.
-
On the dive window, select Butter and Cheese.
-
Click the Focus icon.
-
Click the Report icon to open the Default Report dialog box.
-
To edit the report, click the Unlock icon.
-
If needed,
 drag the columns closer together.
 -
Click the Tabular icon.
-
Double-click the empty column heading to the right of the Revenue column.
-
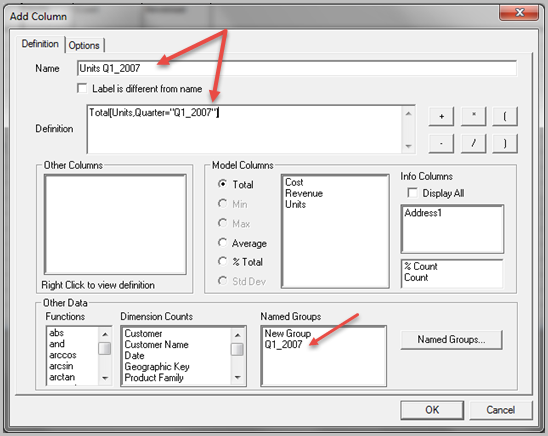
In the Add Column dialog box, click the Named Groups button and perform the following actions in the Edit Named Groups dialog box:
- Type Q1_2007 in the List Group box.
- Select Quarter as the Group Dimension.
- Move the dimension value 2007/1 to the Selected box.
- Click the Add group and close button to open the Add Column dialog box.
-
In the Model Columns section, select Total and click Units to add Units to the Name field and Total(Units) as the Definition or column calculation.
-
To apply the Named Group, click Q1_2007 in the Named Groups box
to create the summary column titled Units Q1_2007 with a Definition calculation of Total[Units,Quarter="Q1_2007"]. -
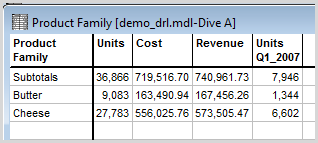
Click OK to add
the Units Q1_2007 summary column. -
Click the Report icon to open the Default Report dialog box, then click OK to accept the report default properties. Perform the following actions:
- Delete the Summary Name item (Units Q1_2007).
- Delete the Summary Value items (row values and summary total).
-
To add a Group Dimension Name item to the report, perform the following actions:
- Click Add Item to open the Add Item dialog box.
- For Item Type, select Group Dimension Name.
- For Summary Name, select Units Q1_2007.
- On the Breaklevel tab, set the Breaklevel to Page and the Location to Head2.
- On the Position tab, set the Column to Column E.
- On the Style tab, set the Style Name to Column Header.
-
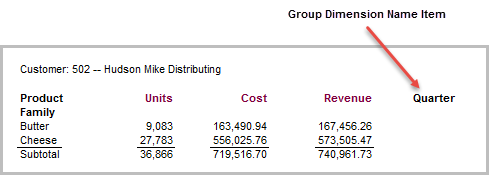
Click OK to add the
Group Dimension Name Quarter to the report. -
To add a Group Value item to the report, perform the following actions:
- Click Add Item to open the Add Item dialog box.
- For Item Type, select Group Value.
- For Summary Name, select Units Q1_2007.
- On the Breaklevel tab, set the Breaklevel dimension to Product Family and the Location to Body.
- On the Position tab, set the Column to Column E.
- On the Style tab, set the Style Name to Text.
-
Click OK to add the
Group Value 2007/1 to the report.

Save this report as a marker (for example, add_a_graphic.mrk), if you want to learn how to add and position a graphic in a report by completing the Adding a Graphic Item topic.