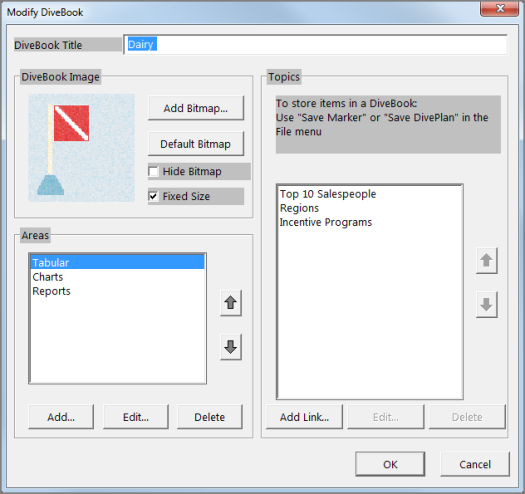
To modify a DiveBook:
-
Open the DiveBook that you want to modify.
-
Do one of the following:
-
On the menu bar, select Window > DiveBook > Modify DiveBook.
-
On the toolbar, open the DiveBook
 context menu, and then select Modify DiveBook.
The Modify DiveBook
 dialog box opens for the current DiveBook.
 -
-
To edit the title, enter up to three lines of title text in the DiveBook Title box.
-
In the DiveBook Image section, you can replace or hide the DiveBook image.
-
To replace the image with a customized graphic, click Add Bitmap.
-
In the Load Graphic window, browse to the bitmap graphic that you want to use, select it, and then click Open.
-
To revert to the default image, click Default Bitmap.
-
To hide the image, click Hide Bitmap.
-
Set the graphic size by selecting or clearing the Fixed Size check box.
-
If the Fixed Size check box is selected, you must set the graphic size using an external graphics editing tool to a maximum of 110 pixels wide and 99 pixels high.
-
If the Fixed Size check box is clear, the graphic size is set to 110 pixels wide and 99 pixels high.
-
-
-
In the Areas section, you can Edit (rename) or Delete a selected area, Add a new area, or use the arrow buttons to change the order of the areas listed.
-
In the Topics section, you can Edit (rename) or Delete a selected topic, click Add Link to link to a topic file or URL, or use the arrow buttons to change the order of the topics listed.
NOTE: When you add a link to a pdf or html file, you must specify a local path to the file.
-
Click OK.

