Adding Tabular Columns
-
-
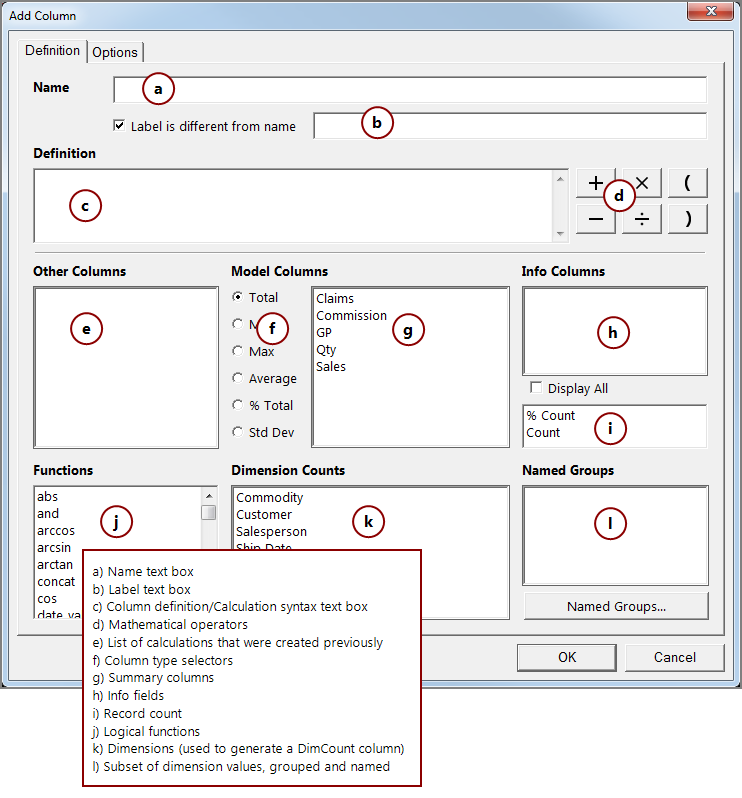
The Add Column
 dialog box
ProDiver populates the Name box based on selections that you make in the Model Columns or Other Data sections of this dialog box. However, you can enter a name for the new column if you want to. The new column will not be added to the dive window if this box is empty.
-
If you want the column label to be something other than the column name, select Label is different from name.
A text box appears adjacent to Label is different from name. Enter the label that you want to appear on the dive window column heading. This label can include characters that are not allowed in the column name. If you enter $(<QuickView_name>), the QuickView value appears as the label.
NOTE: The column label is used in reports and graphs that are generated from the tabular display. However, you must use the column name for other types of references, such as calculation and time-series references.
-
In the Definition box, enter a calculation whose result you want to display in the column. You can enter the calculation syntax directly in the box, or click column names, symbols, and math operators on the window to create the calculation. You can also use a Spectre-language calc.
If you are entering calculations in the Spectre language, you must enclose the expression in backticks. For example:
`filter( dimcount ("OrderNbr"), value("DeliveryDate") = today() )`
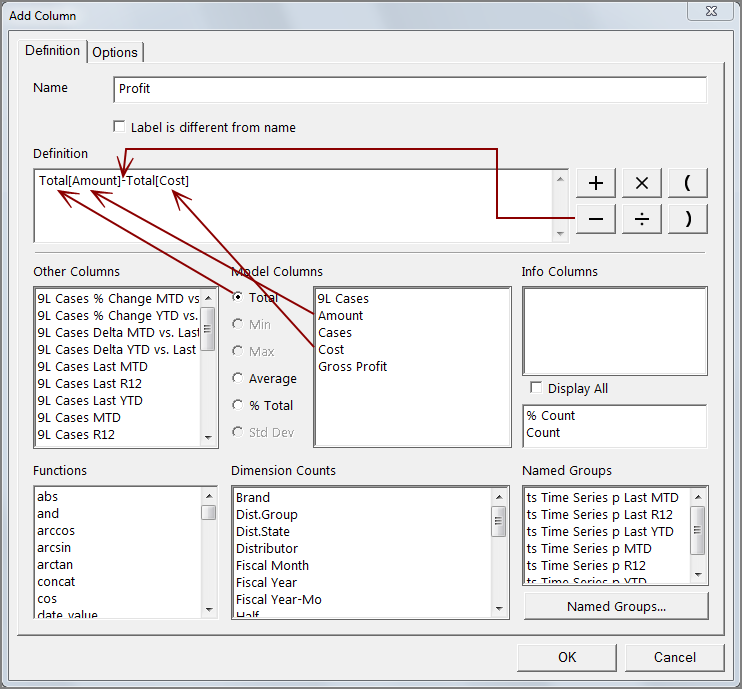
In this
example, the calculation was created by clicking Total, Amount, the minus operator, and Cost.For more information, see Tips for Defining Column Calculations.
The Other Columns box lists calculations that were created previously, if there are any.
NOTE: Simple calculations that can be generated using a single click action on the Add Column dialog box do not appear in the Other Columns box. For example, dimcount[Customer] or Total[Revenue] can be created by clicking on the dimension name (Customer in the Dimension Counts section or Revenue in the Model Columns section).
-
In the Model Columns section, you can specify a
column type and summary to be used in the new column. - Under Info Columns, you can also select info fields that you want to include.
-
Below the list of info fields, you can select Count to display the number of records matching the current row's dimension value (the number of records that meet the criteria for this dive) or %Count to display the percentage of the count.
NOTE: The value of the count is determined by your Diver developer and is specific to the cBase
-
In the Other Data area, you can select Functions, Dimension Counts, and Named Groups to be used in calculations; or click Named Groups to create a Named Group.
- The Functions box provides a list of mathematical functions.
-
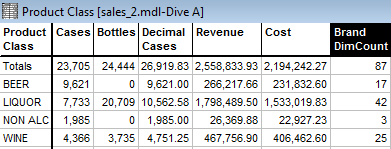
The Dimensions Count box provides a list of dimensions that can be dived on. Selecting from this list creates a column that displays the DimCounts for the selected dimension in the dive window. In this
example, the Brand Dimension Count was selected. The resulting column show the number of brands for each Product Class. - The Named Groups box contains a list of existing Named Groups, if there are any.
-
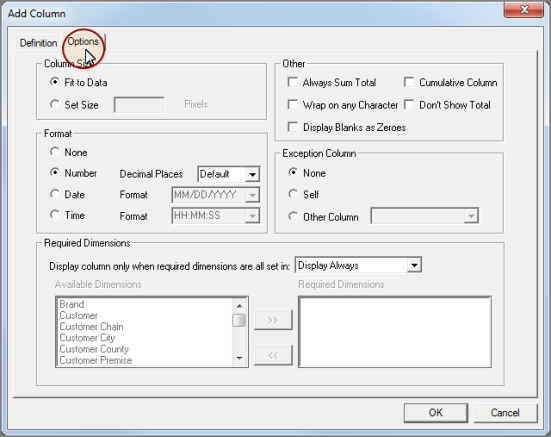
Click the Options
tab. -
In the Column Size section:
- Select Fit to Data if you want ProDiver to set the column width to accommodate the largest data entry.
-
Select Set Size and enter a number of Pixels if you want to set the column width manually.
NOTE: Be sure to set the column wide enough to display the data. Otherwise, the data might not display fully or appear truncated with leading or trailing ellipses.
-
In the Format section, available options depend on the type of column data:
-
Select None if you want the data to display as it appears in the cBase
NOTE: Spectre formatting has more functionality than ProDiver. When the data source is a cBase or cPlan that uses Spectre formatting, data displays in the format specified in the cPlan or Build script.
- Select Number if you want commas to appear on numbers that have four or more digits. You can also change the number of Decimal Places that display (0–6) from the default value of 2.
- Select Date if you want to select a format for date data to display.
- Select Time if you want to select a format for time data to display.
-
-
In the Other section, you can set the following column characteristics:
-
Select Always Sum Total if the column contains a calculation or information field that you want to total.
IMPORTANT: If this option is selected, null and unknown values are not included in the summing. If every value in the column is null or unknown, a blank total is generated.
NOTE: An example of when not to select this option is product unit price data. Providing a total does not add value.
If this option is not set, a calculation on this column uses the totals cell at the parent level (the last thing you dove on).
-
Select Wrap on any Character if you want a long column heading to break on any character (instead of a space) when beginning a new line.
-
Select Display Blanks as Zeroes if you want ProDiver to insert 0 in empty cells in the column.
-
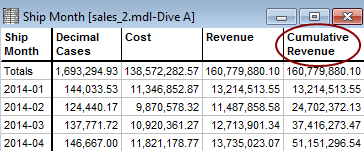
Select Cumulative Column if you want each row to calculate a running total based on the previous rows of summary or calculated data.
ExampleNOTE: When defining calculations, you cannot use cumulative columns as a source.
- Select Don't Show Total if you want the column Totals row to be blank. Applies to tabular displays only.
-
-
Use the Exception Column section if you want to color-code summary data.
-
Select None if you do not want to use exception coloring.
-
Select Self if you want the data to be colored based on its
value as follows: Positive numbers appear green, negative numbers appear red, and zeroes appear blue. -
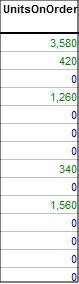
Select Other Column if you want the data to be colored based on the values of another column that you specify. In this
example, the Quantity column is colored based on the values in the UnitsOnOrder column as follows: Positive numbers appear green, negative numbers appear red, and zeroes appear blue.
-
-
Use the Required Dimensions section to define the conditions in which a column appears:
-
Select Display Always if you want the column to appear in all dive windows.
NOTE: If the column is an info field, it will display only if the information pertains to the dimension being dived on. For example, if the column is CustomerPhoneNumber, it would not display when you dive on ProductName.
-
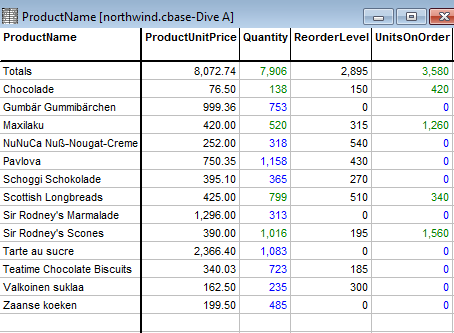
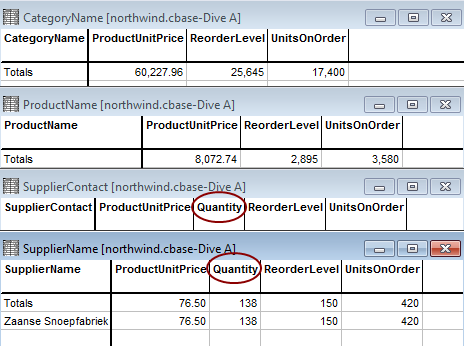
Select In Window Only if you want the column to appear only when you dive on the dimensions listed in the Required Dimensions box. In this
example, the Quantity column is set to display In Window Only and the Required Dimension is ProductName. In the three-level dive, the Quantity column appears only in the middle-level dive window. -
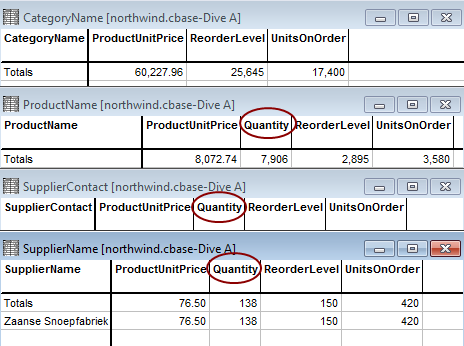
Select In Parent Only if you want the column to appear only in subsequent dives after you dive on the dimensions listed in the Required Dimensions box. In this
example, the Quantity column is set to display In Parent Only and the Required Dimension is ProductName. In the four-level dive, the Quantity column appears after the ProductName-level dive window. -
Select In Window or Parent if you want the column to appear when and after you dive on the dimensions listed in the Required Dimensions box. In this
example, the Quantity column is set to display In Window or Parent and the Required Dimension is ProductName. In the four-level dive, the Quantity column appears in the ProductName-level dive and subsequent dive windows.
-
-
Click OK to close the Add Column window.
The new column is added to the dive window.
To save the new column in the DivePlan, select File > Save DivePlan.
See also: