Configuring Destinations
Use Admin > Destinations to access the Destinations Settings dialog box. This is where you define connections for Bridge.
To define a Bridge destination:
- Click Add to begin.
-
Click the pull-down menu and choose a Destination Type.
There are three Destination Types:
- Web Application—Destination to a web address, including a DivePort instance, possibly with a particular environment and page, or a NetDiver instance, or another website.
- ProDiver—Destination to a project file, opening the file in ProDiver.
- DiveTab—Destination to a DiveTab instance, opening the site with DiveTab.
-
Enter and choose attributes as needed:
NOTE: The attributes change based on the Destination Type.
- Label—Names the available site; appears on the button, and in the Destinations list dialog box.
- Tool Tip Text—Appears as a tooltip when hovered over.
- Link URL—Specifies the Uniform Resource Locator (URL) or web address for a DivePort instance, possibly with a particular environment and page, or a NetDiver or other site on the Web.
- NOTE: Relative paths for destination strings need to start with "/". For example: /path#page=pagename.
- Project Name—The name of a project ProDiver is opening. ProDiver can open a project or a specific file. This attribute is ProDiver specific. If not specified, the ProDiver application is still launched.
- File Path—The exact file path to a file ProDiver is opening. ProDiver can open a project or a specific file. This attribute is ProDiver specific.
-
DiveLine—Indicates the server name and port number for the target portal (for example, jsmith-001:2131). This gives Bridge access to that DiveLine user list. The target DiveLine authorizes Bridge to authenticate users by listing the Bridge's machine in the Authorized DivePort Gateways list under the General tab for Workbench Server Settings.

The DiveLine attribute is required for single sign-on (SSO) to DI applications from Bridge.
TIP: If no DiveLine is specified, a secondary logon displays. A secondary logon also displays when there is no match on the user.
-
Admin Username—Used to control the button display for sites that use DiveLine. If a DiveLine administrator is specified for the target portal, only users in that DiveLine see the target button. If no Admin Username is specified, all visitors to Bridge see the destination as an option, even if they have no credentials. The target DiveLine must authorize Bridge to authenticate users.
NOTE: There is a time delay between the saving of the configuration settings and the actual application of those settings in the Bridge instance. Keep this in mind when you are trying to verify that users are seeing the appropriate buttons.
-
Image URL—Points to a graphic file for the button. The browse button opens a dialog showing thumbnails of all images that came with Bridge or were installed in the <bridge>/customizations/images directory under Bridge’s webdata directory. Contents of the customizations/images directory appear as part of the resources directory. If no image is specified, a blank box appears instead. For example:
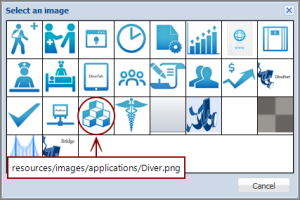
The circled icon was installed with the application.
You can also provide a full URL. For example, https://jsmith-001:3330/bridge-test/resources/images/Diver.png
- Font Size—Indicates Normal (17 pixels) or Small (12 pixels) for the label text.
- Open in new tab—Indicates how the target should open in the browser. When selected, the target opens in a new browser tab; when cleared, the target opens in the current tab.
-
Click OK to save the destination.
The dialog box closes.
Here is an example of Web Application destination to DivePort.

When configuring older DivePorts, take note of the fact that any DivePort or secondary Bridge opened in the same tab as the starting Bridge displays a bridge icon in the tool bar only if it is using the Simplified User Interface (SUI). The SUI option was first available with version 6.4. The icon is interactive, changing into a hand when selected, behaving like the Home and Back buttons.
![]()
TIP: Older DivePort portals, or current ones not using the SUI, should be configured to open in a new tab, so the end user can return to Bridge by selecting the starting tab, since the bridge icon will not be available.
Here is an example of Web Application destination to NetDiver.

Here is an example of Web Application destination to a website.

Here is an example of a ProDiver destination.

Here is an example of a DiveTab destination.

Reorganizing Buttons
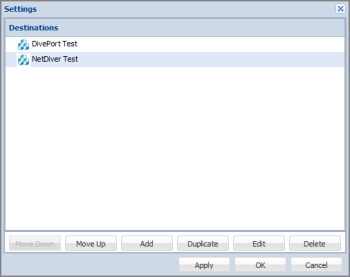
Use Admin > Destinations to see the Settings dialog box with the currently defined buttons.
For example:
To reorder buttons:
- Select a destination.
- Click Move Down or Move Up.
- Repeat as needed.
- Click OK to see the new order presented in the portal.
Making a Copy of a Destination
Use Admin > Destinations to make a copy of, or duplicate, an existing destination within the same Bridge. You still need to change the Link URL to be unique before committing the new destination. In the Destination Settings dialog box, do the following:
- Select a destination.
- Click Duplicate.
- Change the Link URL. This cannot be the same as the existing destination, as the Link URL needs to be unique.
- Make additional changes, as needed.
- Click OK to see the duplicate destination listed under Destinations.
Editing a Destination
To edit the settings for a destination, click Edit in the Destination Settings dialog box, or simply double-click the destination you want to edit. This opens the Destination Settings dialog box for that destination.
Deleting a Destination
Use Admin > Destinations to delete an existing destination. In the Destination Settings dialog box, do the following:
- Select a destination.
-
Click Delete.
The selected destination is removed.