Configuring IIS Windows 7 / Server 2008
Microsoft’s Internet Information Services (IIS) or Internet Information Server, is a Web Server for use with Windows NT. IIS is not turned on by default when Windows is installed and can be accessed through the Microsoft Management Console or Administrative Tools in the Control Panel. This section applies to IIS 7.0 which comes standard in Windows 7 and Server 2008. These steps might not be exact–refer to the latest Microsoft documentation.
To verify the IIS installation:
-
Navigate to Control Panel\Programs\Programs and Features.
NOTE: There are multiple ways to navigate the Windows operating system. This method uses a path in the Windows Explorer.
The Programs and Features window opens.

-
On the left column, click Turn Windows Features on or off.
The Windows Features window opens.
-
Expand Internet Information Services.

-
Select your options. The ones listed below are required.
- Web Management Tools > IIS Management Console
- World Wide Web Services > Application Development Features > CGI
- World Wide Web Services > Security > Windows Authentication
-
Click OK.
The dialog box closes.
NOTE: You might need to restart your computer for these features to take effect.
To create a virtual directory:
-
Navigate to Control Panel\System and Security\Administrative Tools.
NOTE: There are multiple ways to navigate the Windows operating system. This method uses a path in the Windows Explorer.
The Administrative Tools window opens.

-
Click Internet Information Services (IIS).
The Internet Information Services (IIS) Manager opens.

-
On the Connections pane on the left, expand the local computer and Sites.
The Default Web Site displays.
-
Right-click Default Web Site and select Add Virtual Directory from the menu.
The Add Virtual Directory dialog box opens.

- For the Alias, enter cgi-bin and for the Physical Path, browse for the path to the dlcgi.exe file. The default path is C:\DI\Solution\diveline\cgi-bin.
-
Click Connect as.
The Connect As dialog box opens.

- Select the Specific User radio button, Set, fill in the credentials for the user account running DiveLine, and click OK.
-
Do one of the following:
-
If DiveLine and the Web Server are on the same machine, copy the \diveline\install-files\dlcgi-local.cfg file to the diveline\cgi-bin directory.

-
If DiveLine and the Web Server are on different machines, copy the \diveline\install-files\dlcgi-remote.cfg file to the diveline\cgi-bin directory.

-
-
Rename the copied cfg file to dlcgi.cfg and open the file to verify the dl-dataroot directory path, or the server and port number.
NOTE: Repeat Step 1 to 8 for each virtual directory.
To set the permissions to allow DLCGI to run:
-
Navigate to Control Panel\System and Security\Administrative Tools.
NOTE: There are multiple ways to navigate the Windows operating system. This method uses a path in the Windows Explorer.
The Administrative Tools window opens.

-
Click Internet Information Services (IIS).
The Internet Information Services (IIS) Manager opens.

- Navigate to the virtual directory you created previously, cgi-bin.
-
On the center pane, double-click Authentication.
The Authentication options open.

- Enable Windows Authentication and disable all other authentication methods.
-
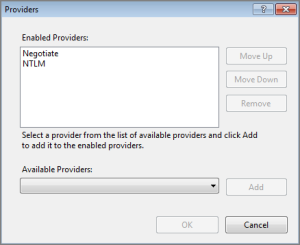
Right-click Windows Authentication, and select Providers from the menu.
The Providers dialog box opens.

- Remove Negotiate from the Enabled Providers and click OK.
-
Select the virtual directory again, double-click Handler Mappings.

-
Double click CGI-exe.
The Edit Module Mapping dialog box opens.

- Click the browse button for the Executable box, and browse to the location of the dlcgi.exe file. The default value is C:\DI\Solution\diveline\cgi-bin\dlcgi.exe. If you cannot see the executable, select exe from the file type pull-down menu.
-
Click OK.
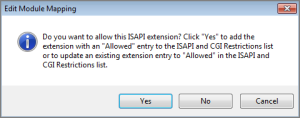
The Edit Module Mapping window opens.

-
Click Yes to accept the changes.
The dialog box closes.
-
Right-click CGI-exe, and select Edit Feature Permissions from the menu.
The Edit Feature Permissions dialog box opens.

- Select the Read, Script, and Execute check boxes, and click OK. This enables CGI-exe.
-
Test this configuration by running dlcgi.exe?raw:
Open a web browser and enter in http://<servername>/cgi-bin/dlcgi.exe?raw.
NOTE: This page might ask for a username and password. Use the server username. For this example, the username is jsmith.
Here is the resulting page:

IIS is now configured for DiveLine’s Web Server authentication under Windows 7.