QuickView settings can specify that

The Diver Platform offers the following display types or styles of QuickView:
-
Flex—By default, a flex QuickView appears as a closed list with an expansion arrow next to it.
 Click the arrow to open the list. To select values, click the space to the left of the value name. A check mark appears to indicate that the value is selected. If enabled, you can select all values by clicking the Select All Values icon
  .
. .
.NOTE: If only one value is selected in a marker-backed QuickView that does not allow All Values, you cannot clear the selected value.
Clicking the Selection Options icon
 , opens a menu that you can use to take action on items in the QuickView list. Available options depend on the QuickView portlet settings.
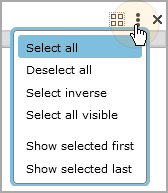
Settings can also specify that the QuickView list is expanded by default, similar to a picklist.
-
Button—Button QuickView appears as a series of buttons. Each button represents a QuickView value.

If selecting multiple values is allowed, be sure that each of the values that you want to include is
 selected. You can use Ctrl+Click (Windows) or Command-Click (macOS) to select multiple values.
 -
Free Entry—A text box that contains a default value. You can enter a new value directly in the QuickView text box.

To use a Free Entry QuickView, enter criteria for the data, and then press Enter.
-
Calendar—A text box that allows you to work with date values. You can enter a date directly into the box or click the calendar icon to select a date.


Selecting an option from a QuickView can update all of the data on a page, or only certain data. For example, a QuickView might update the data in only one table.
Optionally, there might be a Go button that allows you to update multiple QuickViews at once. Change the values as you like, and then click Go to refresh the page with the new values.

NOTE: If the QuickViews are set to activate when Go is pressed, changing a QuickView disables the Print option as well as any click actions until Go is pressed. This ensures that the printed output or click action shows up-to-date data.
Time Range QuickViews
Optionally, a developer can create a ![]() Time Range QuickView that is populated with time ranges such as:
Time Range QuickView that is populated with time ranges such as:
- Today
- Week-to-Date
- Month-to-Date
- Quarter-to-Date
- Year-to-Date
- <n> Days
- <n> Months
- <n> Quarters
- <n> Years
User-Defined Time Range

DivePort administrators create QuickViews and specify their settings.